> ## Documentation Index
> Fetch the complete documentation index at: https://dripart-mintlify-style-transfer-guide-1774068104.mintlify.site/llms.txt
> Use this file to discover all available pages before exploring further.
# Models
## Models are essential
Models are essential building blocks for media generation workflows. They can be combined and mixed to achieve different creative effects.
The word ***model*** has many different meanings. Here, it means a data file carrying information that is required for a node graph to do its work. Specifically, it’s a data structure that *models* some function. As a verb, to model something means to represent it or provide an example.
The primary example of a model data file in ComfyUI is an AI ***diffusion model***. This is a large set of data that represents the complex relationships among text strings and images, making it possible to translate words into pictures or vice versa. Other examples of common models used for image generation are multimodal vision and language models such as CLIP, and upscaling models such as RealESRGAN.
## Model files
Model files are indispensable for generative media production. Without them, workflows cannot proceed effectively. Models are not included in the ComfyUI installation, but ComfyUI can often automatically download and install missing model files. Many models can be downloaded and installed from the **ComfyUI Manager** window. Models can also be found at websites such as [huggingface.co](https://huggingface.co), [civitai.green](https://civitai.green), and [github.com](https://github.com).
### Using Models in ComfyUI
1. Download and place them in the ComfyUI program directory
1. Within the **models** folder, you'll find subfolders for various types of models, such as **checkpoints**
2. The **ComfyUI Manager** helps to automate the process of searching, downloading, and installing
3. Restart ComfyUI if it's running
2. In your workflow, create the node appropriate to the model type, e.g. **Load Checkpoint**, **Load LoRA**, **Load VAE**
3. In the loader node, choose the model you wish to use
4. Connect the loader node to other nodes in your workflow
## Adding Extra Model Paths
If you want to manage your model files outside of `ComfyUI/models`, you may have the following reasons:
* You have multiple ComfyUI instances and want them to share model files to save disk space
* You have different types of GUI programs (such as WebUI) and want them to use the same model files
* Model files cannot be recognized or found
We provide a way to add extra model search paths via the `extra_model_paths.yaml` configuration file
### Open Config File
For the ComfyUI version such as [portable](/installation/comfyui_portable_windows) and [manual](/installation/manual_install), you can find an example file named `extra_model_paths.yaml.example` in the root directory of ComfyUI:
```
ComfyUI/extra_model_paths.yaml.example
```
Copy and rename it to `extra_model_paths.yaml` for use. Keep it in ComfyUI's root directory at `ComfyUI/extra_model_paths.yaml`.
You can also find the config example file [here](https://github.com/comfyanonymous/ComfyUI/blob/master/extra_model_paths.yaml.example)
If you are using the [ComfyUI Desktop](/installation/desktop/windows) application, you can follow the image below to open the extra model config file:
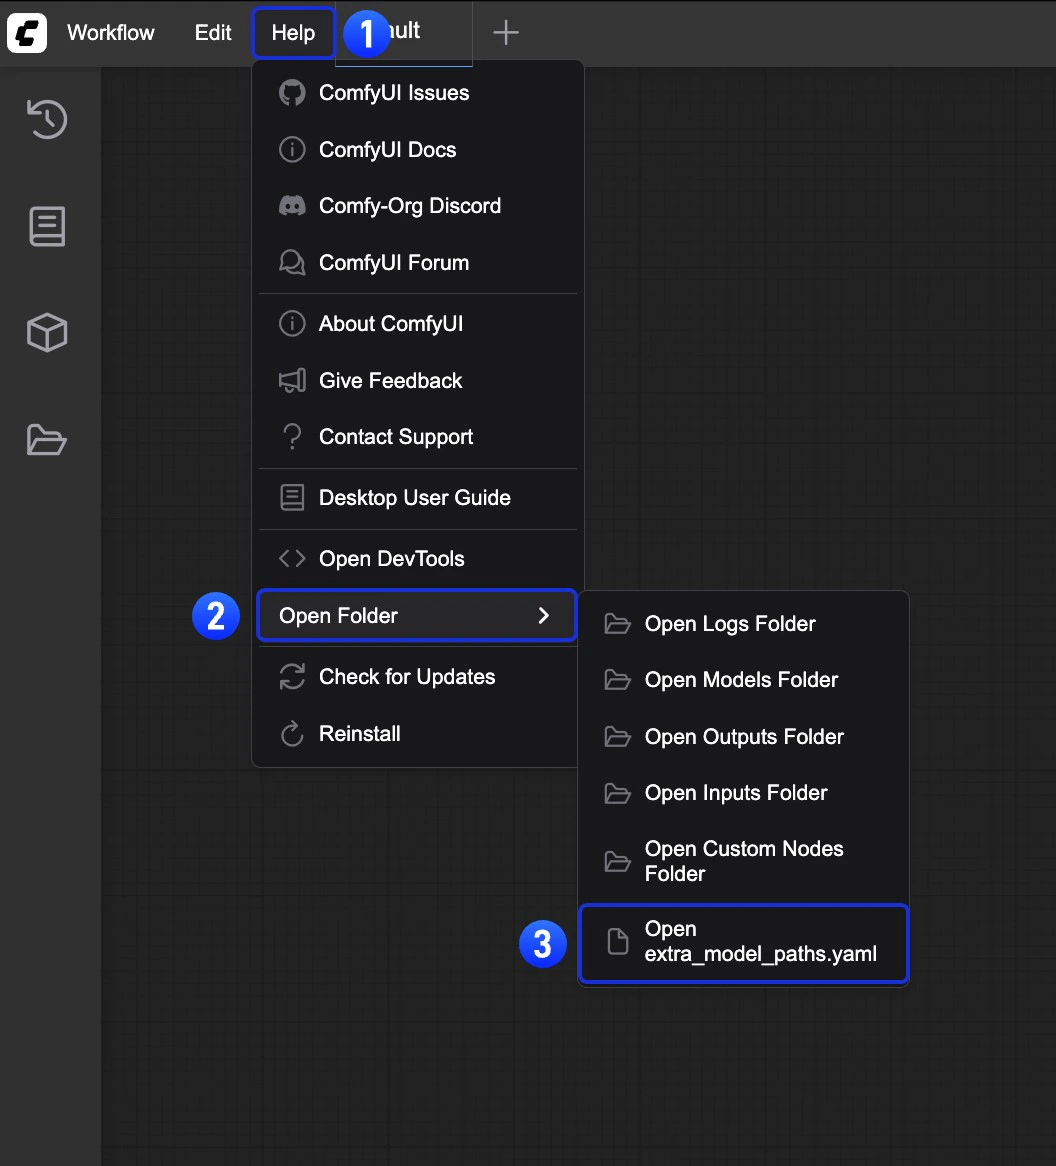 Or open it directly at:
```
C:\Users\YourUsername\AppData\Roaming\ComfyUI\extra_models_config.yaml
```
```
~/Library/Application Support/ComfyUI/extra_models_config.yaml
```
You should keep the file in the same directory, should not move these files to other places.
If the file does not exist, you can create it yourself with any text editor.
### Example Structure
Suppose you want to add the following model paths to ComfyUI:
```
📁 YOUR_PATH/
├── 📁models/
| ├── 📁 loras/
| │ └── xxxxx.safetensors
| ├── 📁 checkpoints/
| │ └── xxxxx.safetensors
| ├── 📁 vae/
| │ └── xxxxx.safetensors
| └── 📁 controlnet/
| └── xxxxx.safetensors
```
Then you can configure the `extra_model_paths.yaml` file like below to let ComfyUI recognize the model paths on your device:
```
my_custom_config:
base_path: YOUR_PATH
loras: models/loras/
checkpoints: models/checkpoints/
vae: models/vae/
controlnet: models/controlnet/
```
or
```
my_custom_config:
base_path: YOUR_PATH/models/
loras: loras
checkpoints: checkpoints
vae: vae
controlnet: controlnet
```
For the desktop version, please add the configuration to the existing configuration path without overwriting the path configuration generated during installation. Please back up the corresponding file before modification, so that you can restore it when you make a mistake.
Or you can refer to the default [extra\_model\_paths.yaml.example](https://github.com/comfyanonymous/ComfyUI/blob/master/extra_model_paths.yaml.example) for more configuration options. After saving, you need to **restart ComfyUI** for the changes to take effect.
Below is the original config example:
```yaml theme={null}
#Rename this to extra_model_paths.yaml and ComfyUI will load it
#config for a1111 ui
#all you have to do is change the base_path to where yours is installed
a111:
base_path: path/to/stable-diffusion-webui/
checkpoints: models/Stable-diffusion
configs: models/Stable-diffusion
vae: models/VAE
loras: |
models/Lora
models/LyCORIS
upscale_models: |
models/ESRGAN
models/RealESRGAN
models/SwinIR
embeddings: embeddings
hypernetworks: models/hypernetworks
controlnet: models/ControlNet
#config for comfyui
#your base path should be either an existing comfy install or a central folder where you store all of your models, loras, etc.
#comfyui:
# base_path: path/to/comfyui/
# # You can use is_default to mark that these folders should be listed first, and used as the default dirs for eg downloads
# #is_default: true
# checkpoints: models/checkpoints/
# clip: models/clip/
# clip_vision: models/clip_vision/
# configs: models/configs/
# controlnet: models/controlnet/
# diffusion_models: |
# models/diffusion_models
# models/unet
# embeddings: models/embeddings/
# loras: models/loras/
# upscale_models: models/upscale_models/
# vae: models/vae/
#other_ui:
# base_path: path/to/ui
# checkpoints: models/checkpoints
# gligen: models/gligen
# custom_nodes: path/custom_nodes
```
For example, if your WebUI is located at `D:\stable-diffusion-webui\`, you can modify the corresponding configuration to
```yaml theme={null}
a111:
base_path: D:\stable-diffusion-webui\
checkpoints: models/Stable-diffusion
configs: models/Stable-diffusion
vae: models/VAE
loras: |
models/Lora
models/LyCORIS
upscale_models: |
models/ESRGAN
models/RealESRGAN
models/SwinIR
embeddings: embeddings
hypernetworks: models/hypernetworks
controlnet: models/ControlNet
```
### Add Extra Custom Nodes Path
Besides adding external models, you can also add custom nodes paths that are not in the default path of ComfyUI
Please note that this will not change the default installation path of custom nodes, but will add an extra path search when starting ComfyUI. You still need to complete the installation of custom node dependencies in the corresponding environment to ensure the integrity of the running environment.
Below is a simple configuration example (MacOS), please modify it according to your actual situation and add it to the corresponding configuration file, save it and restart ComfyUI for the changes to take effect:
```yaml theme={null}
my_custom_nodes:
custom_nodes: /Users/your_username/Documents/extra_custom_nodes
```
### File size
Models can be extremely large files relative to image files. A typical uncompressed image may require a few megabytes of disk storage. Generative AI models can be tens of thousands of times larger, up to tens of gigabytes per model. They take up a great deal of disk space and take a long time to transfer over a network.
## Model training and refinement
A generative AI model is created by training a machine learning program on a very large set of data, such as pairs of images and text descriptions. An AI model doesn’t store the training data explicitly, but rather it stores the correlations that are implicit within the data.
Organizations and companies such as Stability AI and Black Forest Labs release “base” models that carry large amounts of generic information. These are general purpose generative AI models. Commonly, the base models need to be ***refined*** in order to get high quality generative outputs. A dedicated community of people work to refine the base models. The new, refined models produce better output, provide new or different functionality, and/or use fewer resources. Refined models can usually be run on systems with less computing power and/or memory.
## Auxiliary models
Model functionality can be extended with auxiliary models. For example, art directing a text-to-image workflow to achieve a specific result may be difficult or impossible using a diffusion model alone. Additional models can refine a diffusion model within the workflow graph to produce desired results. Examples include **LoRA** (Low Rank Adaptation), a small model that is trained on a specific subject; **ControlNet**, a model that helps control composition using a guide image; and **Inpainting**, a model that allows certain diffusion models to generate new content within an existing image.
Or open it directly at:
```
C:\Users\YourUsername\AppData\Roaming\ComfyUI\extra_models_config.yaml
```
```
~/Library/Application Support/ComfyUI/extra_models_config.yaml
```
You should keep the file in the same directory, should not move these files to other places.
If the file does not exist, you can create it yourself with any text editor.
### Example Structure
Suppose you want to add the following model paths to ComfyUI:
```
📁 YOUR_PATH/
├── 📁models/
| ├── 📁 loras/
| │ └── xxxxx.safetensors
| ├── 📁 checkpoints/
| │ └── xxxxx.safetensors
| ├── 📁 vae/
| │ └── xxxxx.safetensors
| └── 📁 controlnet/
| └── xxxxx.safetensors
```
Then you can configure the `extra_model_paths.yaml` file like below to let ComfyUI recognize the model paths on your device:
```
my_custom_config:
base_path: YOUR_PATH
loras: models/loras/
checkpoints: models/checkpoints/
vae: models/vae/
controlnet: models/controlnet/
```
or
```
my_custom_config:
base_path: YOUR_PATH/models/
loras: loras
checkpoints: checkpoints
vae: vae
controlnet: controlnet
```
For the desktop version, please add the configuration to the existing configuration path without overwriting the path configuration generated during installation. Please back up the corresponding file before modification, so that you can restore it when you make a mistake.
Or you can refer to the default [extra\_model\_paths.yaml.example](https://github.com/comfyanonymous/ComfyUI/blob/master/extra_model_paths.yaml.example) for more configuration options. After saving, you need to **restart ComfyUI** for the changes to take effect.
Below is the original config example:
```yaml theme={null}
#Rename this to extra_model_paths.yaml and ComfyUI will load it
#config for a1111 ui
#all you have to do is change the base_path to where yours is installed
a111:
base_path: path/to/stable-diffusion-webui/
checkpoints: models/Stable-diffusion
configs: models/Stable-diffusion
vae: models/VAE
loras: |
models/Lora
models/LyCORIS
upscale_models: |
models/ESRGAN
models/RealESRGAN
models/SwinIR
embeddings: embeddings
hypernetworks: models/hypernetworks
controlnet: models/ControlNet
#config for comfyui
#your base path should be either an existing comfy install or a central folder where you store all of your models, loras, etc.
#comfyui:
# base_path: path/to/comfyui/
# # You can use is_default to mark that these folders should be listed first, and used as the default dirs for eg downloads
# #is_default: true
# checkpoints: models/checkpoints/
# clip: models/clip/
# clip_vision: models/clip_vision/
# configs: models/configs/
# controlnet: models/controlnet/
# diffusion_models: |
# models/diffusion_models
# models/unet
# embeddings: models/embeddings/
# loras: models/loras/
# upscale_models: models/upscale_models/
# vae: models/vae/
#other_ui:
# base_path: path/to/ui
# checkpoints: models/checkpoints
# gligen: models/gligen
# custom_nodes: path/custom_nodes
```
For example, if your WebUI is located at `D:\stable-diffusion-webui\`, you can modify the corresponding configuration to
```yaml theme={null}
a111:
base_path: D:\stable-diffusion-webui\
checkpoints: models/Stable-diffusion
configs: models/Stable-diffusion
vae: models/VAE
loras: |
models/Lora
models/LyCORIS
upscale_models: |
models/ESRGAN
models/RealESRGAN
models/SwinIR
embeddings: embeddings
hypernetworks: models/hypernetworks
controlnet: models/ControlNet
```
### Add Extra Custom Nodes Path
Besides adding external models, you can also add custom nodes paths that are not in the default path of ComfyUI
Please note that this will not change the default installation path of custom nodes, but will add an extra path search when starting ComfyUI. You still need to complete the installation of custom node dependencies in the corresponding environment to ensure the integrity of the running environment.
Below is a simple configuration example (MacOS), please modify it according to your actual situation and add it to the corresponding configuration file, save it and restart ComfyUI for the changes to take effect:
```yaml theme={null}
my_custom_nodes:
custom_nodes: /Users/your_username/Documents/extra_custom_nodes
```
### File size
Models can be extremely large files relative to image files. A typical uncompressed image may require a few megabytes of disk storage. Generative AI models can be tens of thousands of times larger, up to tens of gigabytes per model. They take up a great deal of disk space and take a long time to transfer over a network.
## Model training and refinement
A generative AI model is created by training a machine learning program on a very large set of data, such as pairs of images and text descriptions. An AI model doesn’t store the training data explicitly, but rather it stores the correlations that are implicit within the data.
Organizations and companies such as Stability AI and Black Forest Labs release “base” models that carry large amounts of generic information. These are general purpose generative AI models. Commonly, the base models need to be ***refined*** in order to get high quality generative outputs. A dedicated community of people work to refine the base models. The new, refined models produce better output, provide new or different functionality, and/or use fewer resources. Refined models can usually be run on systems with less computing power and/or memory.
## Auxiliary models
Model functionality can be extended with auxiliary models. For example, art directing a text-to-image workflow to achieve a specific result may be difficult or impossible using a diffusion model alone. Additional models can refine a diffusion model within the workflow graph to produce desired results. Examples include **LoRA** (Low Rank Adaptation), a small model that is trained on a specific subject; **ControlNet**, a model that helps control composition using a guide image; and **Inpainting**, a model that allows certain diffusion models to generate new content within an existing image.
 ## Uninstalling models
ComfyUI does not currently support uninstalling models through the frontend interface. If you want to remove or uninstall models, you need to manually delete the corresponding model files from the `ComfyUI/models/` directory on your system.
## Common issues
ComfyUI does not natively support GGUF format models. To use GGUF models, you need to install community custom nodes such as [ComfyUI-GGUF](https://github.com/city96/ComfyUI-GGUF).
If you've installed a model but can't find it in ComfyUI, try these steps:
* Verify the model is in the correct location:
* For **ComfyUI Desktop**: Go to **Help** menu → **Open Folder** → **Open Model Folder** to check the model installation path
* Ensure your model file is placed in the correct subfolder (e.g., `checkpoints`, `loras`, `vae`)
* Press the `r` key to refresh node definitions so ComfyUI can detect the model
* Restart ComfyUI
* Ensure the correct model is selected in the model loader node
## Uninstalling models
ComfyUI does not currently support uninstalling models through the frontend interface. If you want to remove or uninstall models, you need to manually delete the corresponding model files from the `ComfyUI/models/` directory on your system.
## Common issues
ComfyUI does not natively support GGUF format models. To use GGUF models, you need to install community custom nodes such as [ComfyUI-GGUF](https://github.com/city96/ComfyUI-GGUF).
If you've installed a model but can't find it in ComfyUI, try these steps:
* Verify the model is in the correct location:
* For **ComfyUI Desktop**: Go to **Help** menu → **Open Folder** → **Open Model Folder** to check the model installation path
* Ensure your model file is placed in the correct subfolder (e.g., `checkpoints`, `loras`, `vae`)
* Press the `r` key to refresh node definitions so ComfyUI can detect the model
* Restart ComfyUI
* Ensure the correct model is selected in the model loader node